CONTRIBUTING
sick_scan_xd Maintenance and Development Documentation
Executive Summary
This documentation provides background information on maintaining, testing, and extending the sick_scan_xd repository.
Table of Contents
Adding a new device to the driver
This driver is designed to support several sensor families from SICK. This documentation describes how to add additional devices to the driver.
Naming convention
For each device type a name pattern is assigned as follows:
sick_<device family>_<identifier>
The name type is used in the code to decide which scanner-specific parameters are set. The name type is passed as a parameter as follows:
<param name="scanner_type" type="string" value="sick_lms_5xx" />
Launch files
A launch file is created for each device type, which usually has the same naming convention as the scanner type. To create a new device, it is recommended to copy, rename and edit an existing launch file.
Code modification
Hint: Construction of parser:
sick_scan_xd::SickGenericParser *parser = new sick_scan_xd::SickGenericParser(scannerName);
Add string constant like the constant SICK_SCANNER_RMS_XXXX_NAME
Append this constant to allowedScannerNames like allowedScannerNames.push_back(SICK_SCANNER_RMS_XXXX_NAME); in the file sick_generic_parser.cpp
Add new parameter block like
if (basicParams[i].getScannerName().compare(SICK_SCANNER_MRS_1XXX_NAME) == 0)
{...
} in the file sick_generic_parser.cpp
Copy the file sick_generic_radar.cpp and add a new class following the structure of this file.
Bloom releases
Summary of bloom release build:
Update release repositories for rosdistros humble, iron, jazzy and kilted with
bloom-releaseon Linux:cd /tmp bloom-release --rosdistro humble -d sick_scan_xd # update release repository https://github.com/ros2-gbp/sick_scan_xd-release.git, argument -d enables debug infos bloom-release --rosdistro iron -d sick_scan_xd # update release repository https://github.com/ros2-gbp/sick_scan_xd-release.git, argument -d enables debug infos bloom-release --rosdistro jazzy -d sick_scan_xd # update release repository https://github.com/ros2-gbp/sick_scan_xd-release.git, argument -d enables debug infos bloom-release --rosdistro kilted -d sick_scan_xd # update release repository https://github.com/ros2-gbp/sick_scan_xd-release.git, argument -d enables debug infos
Confirm “push to release” and “open pull request” with Y. If
bloom-releaseis not installed, then install it bysudo apt-get install python-bloom.Check that the new version is committed in the release repositories https://github.com/SICKAG/sick_scan_xd-release.git (ROS 1) and https://github.com/ros2-gbp/sick_scan_xd-release.git (ROS 2).
Check Jenkins build status (new Jenkins build after 0-3 days):
EOL - just for information: ROS 1 noetic jenkins build status: https://build.ros.org/job/Ndev__sick_scan_xd__ubuntu_focal_amd64/lastBuild/
ROS 2 humble jenkins build status: https://build.ros2.org/job/Hdev__sick_scan_xd__ubuntu_jammy_amd64/lastBuild/
ROS 2 iron jenkins build status: https://build.ros2.org/job/Idev__sick_scan_xd__ubuntu_jammy_amd64/lastBuild/
ROS 2 jazzy jenkins build status: https://build.ros2.org/job/Jdev__sick_scan_xd__ubuntu_noble_amd64/lastBuild/
Check apt version after 4-6 weeks with
sudo apt show ros-<distro>-sick-scan-xd:cd /tmp sudo apt update # EOL sudo apt show ros-noetic-sick-scan-xd sudo apt show ros-humble-sick-scan-xd sudo apt show ros-iron-sick-scan-xd sudo apt show ros-jazzy-sick-scan-xd sudo apt show ros-kilted-sick-scan-xd
First time installation of toolchain
Install on Linux:
Install bloom:
sudo apt-get update
sudo apt-get install python3-bloom python3-catkin-pkg
Install docker:
pushd /tmp
curl -fsSL https://get.docker.com -o get-docker.sh
sudo sh get-docker.sh
sudo usermod -aG docker $USER
popd
shutdown -r now # reboot
# short quicktest
docker --version
docker info
docker run hello-world
Install ros-buildfarm:
# sudo apt-get install python3-ros-buildfarm # not successfully, unable to locate
pip3 install ros-buildfarm # installs ros-buildfarm 3.0 successfully
Build the prerelease:
Short version to build a prerelease:
Run the following commands:
mkdir -p ./ws_sick_scan_xd_bloom/src
cd ./ws_sick_scan_xd_bloom/src
git clone -b master https://github.com/SICKAG/sick_scan_xd.git
cd ./sick_scan_xd/test/scripts
./run_linux_ros1_bloom.bash
Fix any errors during the prerelease build and check in
Repeat
./run_linux_ros1_bloom.bashuntil the prerelease build finishes without errors
Alternative version:
Open http://prerelease.ros.org/noetic in the browser
Add a custom repository:
sick_scan_xd,https://github.com/SICKAG/sick_scan_xd,master(orfeature/bloom_pretestor any other branch to test)Add a custom repository:
msgpack11,https://github.com/SICKAG/msgpack11,masterAdd a custom repository:
libsick_ldmrs,https://github.com/SICKAG/libsick_ldmrs,masterConfirm next steps (i.e. URL of build farm: https://raw.githubusercontent.com/ros-infrastructure/ros_buildfarm_config/production/index.yaml, Ubuntu focal)
Click on
Generate commandRun the generated command, i.e.:
source /opt/ros/noetic/setup.bash
mkdir -p /tmp/prerelease_job
cd /tmp/prerelease_job
generate_prerelease_script.py \
  https://raw.githubusercontent.com/ros-infrastructure/ros_buildfarm_config/production/index.yaml \
  noetic default ubuntu focal amd64 \
  --custom-repo \
    sick_scan_xd:git:https://github.com/SICKAG/sick_scan_xd:master \
    msgpack11:git:https://github.com/SICKAG/msgpack11:master \
    libsick_ldmrs:git:https://github.com/SICKAG/libsick_ldmrs:master \
  --level 1 \
  --output-dir ./
Run
printf "\033c" ; rm -rf ~/.ccache ; mkdir -p ~/.ccache ; ./prerelease.shin folder/tmp/prerelease_jobIn case of error message
/usr/lib/ccache/cc is not able to compile a simple test program:Remove folder
~/.ccachebefore running./prerelease.shSee https://answers.ros.org/question/347063/error-pre-release-melodic/
Fix any errors during the prerelease build and check in
Remove the temporary build folder by
rm -rf /tmp/prerelease_jobRepeat until
prerelease.shfinishes without errors.
Submit package sick_scan_xd for indexing (noetic)
Fork
https://github.com/ros/rosdistro->https://github.com/<username>/rosdistro.gitgit clone https://github.com/<username>/rosdistro.gitEdit file
rosdistro/noetic/distribution.yamland add aftersick_scan:sick_scan_xd: doc: type: git url: https://github.com/SICKAG/sick_scan_xd.git version: master
cd rosdistro ; source /opt/ros/noetic/setup.bash ; rosdistro_reformat file://"$(pwd)"/index.yamlgit commit:
git commit -m "Adding sick_scan_xd to documentation index for distro noetic" distribution.yamlgit push:
git push origin masterSubmit a pull request on
https://github.com/<username>/rosdistro
For ROS2 humble: Follow instructions on https://docs.ros.org/en/humble/How-To-Guides/Releasing/Releasing-a-Package.html
NOTE: Bloom releases for ROS 2 foxy are no longer supported (Pull request failed, “This pull request changes files for a ROS distribution that is no longer supported (End Of Life)”)
Submit package sick_scan_xd for indexing (ROS 2 humble)
Reset fork
https://github.com/<username>/rosdistro.gitto origin/master or delete the fork and create a new one ->https://github.com/<username>/rosdistro.gitgit clone https://github.com/<username>/rosdistro.gitEdit file
rosdistro/humble/distribution.yamland add aftersick_safevisionary_ros2:sick_scan_xd: doc: type: git url: https://github.com/SICKAG/sick_scan_xd.git version: develop status: developed
git commit and push (“Adding sick_scan_xd to documentation index for distro humble”)
Submit a pull request on
https://github.com/<username>/rosdistroDo the same for any new ROS 2 version, e.g. iron and jazzy (
rosdistro/iron/distribution.yaml,rosdistro/jazzy/distribution.yaml)
-
ROS 2 sick_scan_xd team: https://github.com/orgs/ros2-gbp/teams/sick_scan_xd
ROS 2 sick_scan_xd release repository: https://github.com/ros2-gbp/sick_scan_xd-release
Release build for ROS 1
Build a prerelease (dry run in a docker container):
Run the following commands:
git clone -b master https://github.com/SICKAG/sick_scan_xd.git
cd ./sick_scan_xd/test/scripts
sudo dos2unix ./*.bash ; sudo chmod a+x ./*.bash
./run_linux_ros1_bloom.bash
Fix any errors during the prerelease build and check in
Repeat
./run_linux_ros1_bloom.bashuntil the prerelease build finishes without errors
Build a binary release: follow https://wiki.ros.org/bloom/Tutorials/FirstTimeRelease
Update version number in package.xml, minor version number should be incremented at least
Create resp. update CHANGELOG.rst:
source /opt/ros/noetic/setup.bash
cd ./src/sick_scan_xd
rm ./CHANGELOG.rst
catkin_generate_changelog --all # create CHANGELOG.rst
Commit and pull all changes incl. CHANGELOG.rst and package.xml:
git add CHANGELOG.rst package.xml
git commit -m "Update CHANGELOG.rst and package version"
git push
Run
catkin_prepare_releaseandbloom-releasein foldersrc/sick_scan_xd:source /opt/ros/noetic/setup.bash catkin_prepare_release -y bloom-release --rosdistro noetic --track noetic sick_scan_xd # at first time: call with option --edit for configuration
For the initial release (first time): Run
bloom-releasein foldersrc/sick_scan_xdwith option--edit:source /opt/ros/noetic/setup.bash catkin_prepare_release -y bloom-release --rosdistro noetic --track noetic sick_scan_xd --edit Release repository url: https://github.com/SICKAG/sick_scan_xd-release.git upstream: <default, i.e. press ENTER> Upstream Repository URI: https://github.com/SICKAG/sick_scan_xd.git Upstream VCS Type: <default: git, i.e. press ENTER> Version: <default: auto, i.e. press ENTER> Release Tag: <default: version, i.e. press ENTER> Upstream Devel Branch: feature/bloom_pretest ROS Distro: noetic Patches Directory: <default: none, i.e. press ENTER> Release Repository Push URL: <default: none, i.e. press ENTER>
Check status: https://index.ros.org/p/sick_scan_xd/#noetic
Install binary release:
sudo apt update ; sudo apt-get install ros-noetic-sick-scan-xd. Note from https://wiki.ros.org/bloom/Tutorials/FirstTimeRelease : Packages built are periodically synchronized over to the shadow-fixed and public repositories, so it might take as long as a month before your package is available on the public ROS Debian repositories (i.e. available via apt-get).
Release build for ROS 2
For ROS 2 follow the instructions on https://docs.ros.org/en/humble/How-To-Guides/Releasing/Releasing-a-Package.html :
Checkout the sick_scan_xd version to be released and run:
git clone -b master https://github.com/SICKAG/sick_scan_xd.git
cd ./sick_scan_xd
rm ./CHANGELOG.rst
catkin_generate_changelog --all # create CHANGELOG.rst
Commit CHANGELOG.rst and optional modifications:
git add CHANGELOG.rst
git commit -m "Update CHANGELOG.rst"
git push
Run
catkin_prepare_releaseandbloom-release:bloom-release --rosdistro humble --track humble sick_scan_xd # at first time: call with option --new-track
For the initial release (i.e. at the first time) of a new ROS2 version: Run bloom-release configuration with option –new-track:
bloom-release --new-track --rosdistro humble --track humble sick_scan_xdRelease repository url: https://github.com/ros2-gbp/sick_scan_xd-release.git
Upstream:
Upstream Repository URI: https://github.com/SICKAG/sick_scan_xd.git
Upstream Devel Branch: develop
ROS Distro: humble After the initial release has been approved: Run
sudo rosdep init
rosdep update
Check status
Jenkins build status:
ROS 1 noetic jenkins build status: https://build.ros.org/job/Ndev__sick_scan_xd__ubuntu_focal_amd64/lastBuild/
ROS 2 humble jenkins build status: https://build.ros2.org/job/Hdev__sick_scan_xd__ubuntu_jammy_amd64/lastBuild/
ROS 2 iron jenkins build status: https://build.ros2.org/job/Idev__sick_scan_xd__ubuntu_jammy_amd64/lastBuild/
ROS 2 jazzy jenkins build status: https://build.ros2.org/job/Jdev__sick_scan_xd__ubuntu_noble_amd64/lastBuild/
ROS 2 kilted jenkins build status: https://build.ros2.org/job/Kdev__sick_scan_xd__ubuntu_noble_amd64/lastBuild/
ROS 1 jenkins: https://build.ros.org/search/?q=sick_scan_xd
ROS 2 jenkins: https://build.ros2.org/search/?q=sick_scan_xd
Release repositories:
ROS 1 release repository: https://github.com/SICKAG/sick_scan_xd-release
ROS 2 release repository: https://github.com/ros2-gbp/sick_scan_xd-release.git
Show version and list information about prebuilt binaries:
sudo apt update
sudo apt show ros-noetic-sick-scan-xd
sudo apt show ros-humble-sick-scan-xd
sudo apt show ros-iron-sick-scan-xd
sudo apt show ros-jazzy-sick-scan-xd
sudo apt show ros-kilted-sick-scan-xd (coming soon - currently not available)
Installation of prebuilt binaries:
sudo apt update
sudo apt-get install ros-noetic-sick-scan-xd
sudo apt-get install ros-humble-sick-scan-xd
sudo apt-get install ros-iron-sick-scan-xd
sudo apt-get install ros-jazzy-sick-scan-xd
sudo apt-get remove ros-noetic-sick-scan-xd
sudo apt-get remove ros-humble-sick-scan-xd
sudo apt-get remove ros-iron-sick-scan-xd
sudo apt-get remove ros-jazzy-sick-scan-xd
sudo apt-get remove ros-kilted-sick-scan-xd (coming soon - currently not available)
Useful links and information
http://wiki.ros.org/bloom
https://wiki.ros.org/bloom/Tutorials/FirstTimeRelease
https://docs.ros.org/en/humble/How-To-Guides/Releasing/Releasing-a-Package.html
Background information of ROS2 build engine and release pretest
Bloom builds an old sick_scan_xd version (ROS 1)
Check devel_branch in https://github.com/SICKAG/sick_scan_xd-release/blob/master/tracks.yaml . If devel_branch is an old branch, replace it with e.g. develop or master, or update the <devel_branch> to a new version.
Bloom builds an old sick_scan_xd version (ROS 2)
Check devel_branch in https://github.com/ros2-gbp/sick_scan_xd-release/blob/master/tracks.yaml . If devel_branch is an old branch, replace it with e.g. develop or master, or update the <devel_branch> to a new version.
Bloom builds a new sick_scan_xd version, but apt still installs an old version
Check the sick_scan_xd version in the release repositories https://github.com/SICKAG/sick_scan_xd-release.git (ROS 1) and https://github.com/ros2-gbp/sick_scan_xd-release.git (ROS 2)
Install bloom (if not yet done) using
sudo apt-get install python-bloomon Linux orpip install -U bloomon WindowsRun
bloom-release --rosdistro noetic -d sick_scan_xd # release repository: https://github.com/SICKAG/sick_scan_xd-release.git, argument -d enables debug infos bloom-release --rosdistro humble -d sick_scan_xd # release repository: https://github.com/ros2-gbp/sick_scan_xd-release.git, argument -d enables debug infos bloom-release --rosdistro iron -d sick_scan_xd # release repository: https://github.com/ros2-gbp/sick_scan_xd-release.git, argument -d enables debug infos bloom-release --rosdistro jazzy -d sick_scan_xd # release repository: https://github.com/ros2-gbp/sick_scan_xd-release.git, argument -d enables debug infosIn case of GitHub 2FA errors: Follow http://wiki.ros.org/bloom/Tutorials/GithubManualAuthorization to create a 2FA token and configure the token in file
~/.config/bloom.Note: Updates of release repository https://github.com/SICKAG/sick_scan_xd-release.git require GitHub authentication via SSH. See https://docs.github.com/en/authentication/connecting-to-github-with-ssh and https://wiki.ros.org/bloom/Tutorials/GithubManualAuthorization for details.
Unit tests
For a quick unit test after installation without the sensor hardware, a test server is provided to simulate a scanner. It implements a simple TCP server, which responds to binary cola messages and sends predefined LMDscandata to a TCP client. The sick_scan_xd driver can connect to the local test server instead of the lidar device for offline-tests. Please note, that this test server does not emulate a Lidar sensor. It just sends some simple scan data and response messages to a TCP client. It can be used for a quick unit test after build and install. To build the test server, activate cmake option ENABLE_EMULATOR in CMakeLists.txt and rebuild sick_scan_xd. By default, option ENABLE_EMULATOR is switched off.
For a unit test of LMS1xx, run the following commands in different terminals:
cd sick_scan_xd
source ./install/setup.bash

# Start sick_scan_xd emulator
roslaunch sick_scan_xd emulator_lms1xx.launch &
sleep 1

# Start rviz
rosrun rviz rviz -d ./src/sick_scan_xd/test/emulator/config/rviz_lms1xx.rviz &
sleep 1

# Start sick_scan_xd driver
roslaunch sick_scan_xd sick_lms_1xx.launch hostname:=127.0.0.1
For a unit test of LMS5xx, run the following commands in different terminals:
cd sick_scan_xd
source ./install/setup.bash

# Start sick_scan_xd emulator
roslaunch sick_scan_xd emulator_lms5xx.launch &
sleep 1

# Start rviz
rosrun rviz rviz -d ./src/sick_scan_xd/test/emulator/config/rviz_lms5xx.rviz &
sleep 1

# Start sick_scan_xd driver
roslaunch sick_scan_xd sick_lms_5xx.launch hostname:=127.0.0.1
For a unit test of LMS7xx, run the following commands in different terminals:
cd sick_scan_xd
source ./install/setup.bash

# Start sick_scan_xd emulator
roslaunch sick_scan_xd emulator_01_default.launch &
sleep 1

# Start rviz
rosrun rviz rviz -d ./src/sick_scan_xd/test/emulator/config/rviz_emulator_cfg.rviz &
sleep 1

# Start sick_scan_xd driver
roslaunch sick_scan_xd sick_tim_7xx.launch hostname:=127.0.0.1
For a unit test of LMS7xxS, run the following commands in different terminals:
cd sick_scan_xd
source ./install/setup.bash

# Start sick_scan_xd emulator
roslaunch sick_scan_xd emulator_01_default.launch &
sleep 1

# Start rviz
rosrun rviz rviz -d ./src/sick_scan_xd/test/emulator/config/rviz_emulator_cfg.rviz &
sleep 1

# Start sick_scan_xd driver
roslaunch sick_scan_xd sick_tim_7xxS.launch hostname:=127.0.0.1
Alternatively, you can just run the test scripts provided in folder sick_scan_xd/test/scripts:
cd sick_scan_xd/test/scripts
./makeall.bash
./run_simu_lms1xx.bash
./run_simu_lms5xx.bash
./run_simu_tim7xx_tim7xxS.bash
Make sure to finish all sick_scan_xd nodes after a test. All nodes can be killed by
rosnode kill -a ; sleep 1
killall sick_generic_caller ; sleep 1
killall sick_scan_emulator ; sleep 1
Examples
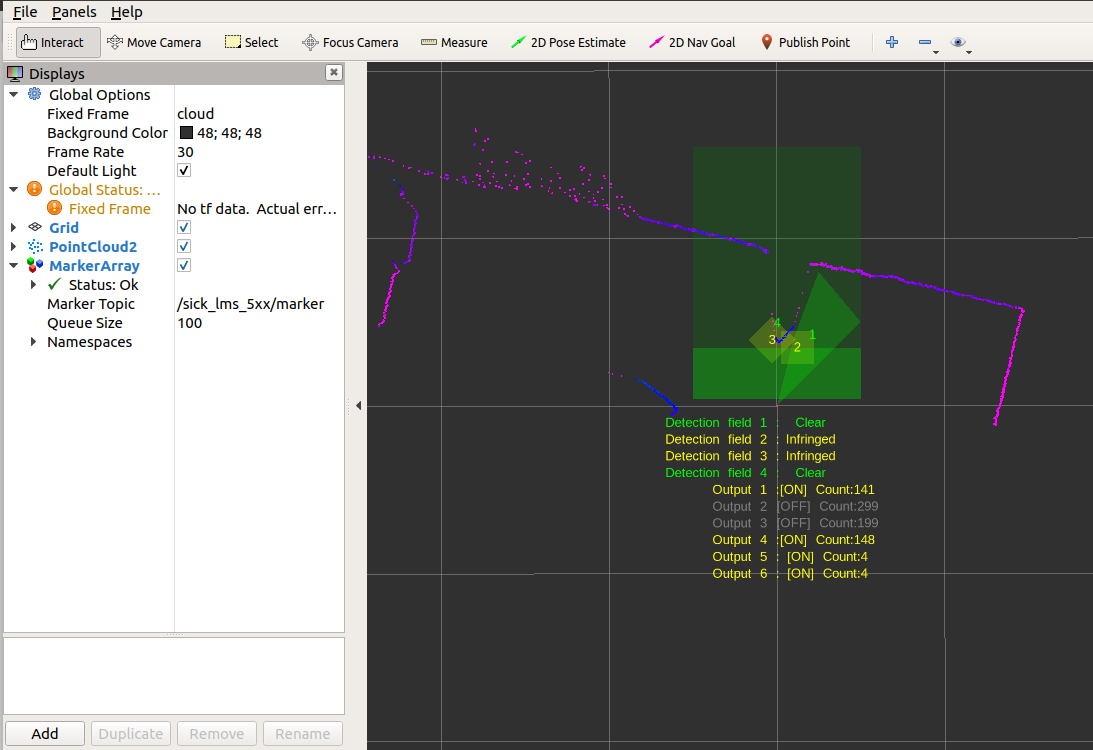
rviz example screenshots using sick_scan_xd with LMS1xx and LMS5xx test server:
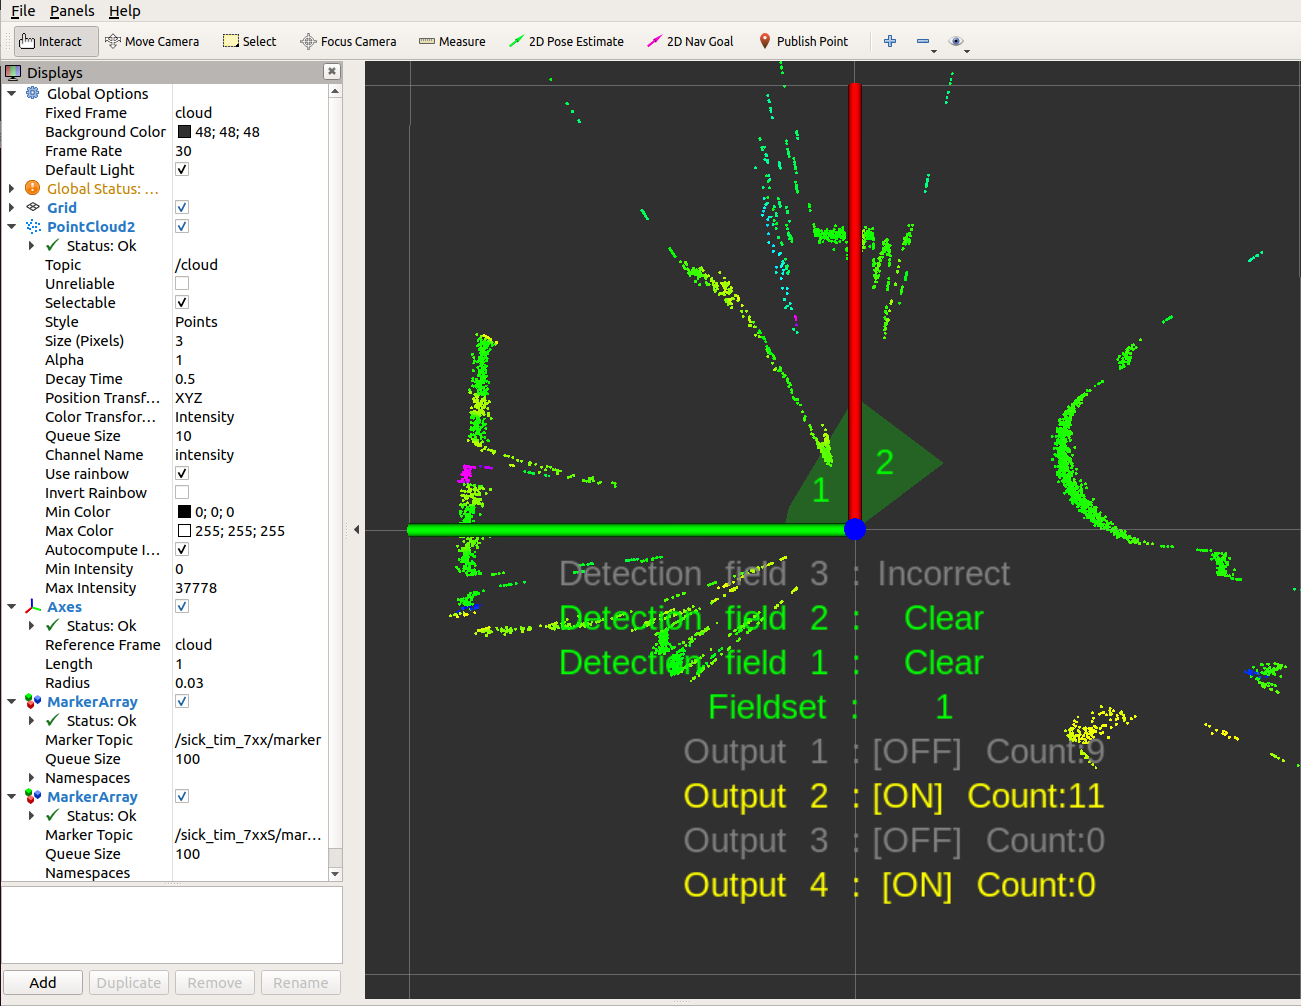
rviz example screenshots using sick_scan_xd with LMS7xx and LMS7xxS test server:
Further examples are provided in folder test/scripts.
Docker testing
Docker on Linux
Run the following steps to install and run docker on Linux:
Install Docker:
Follow the instructions on https://docs.docker.com/desktop/install/ubuntu/
or (more recommended) install Docker without Docker Desktop by running
pushd /tmp
curl -fsSL https://get.docker.com -o get-docker.sh
sudo sh get-docker.sh
sudo usermod -aG docker $USER
popd
Reboot
Quicktest: Run
docker --version
docker info
docker run hello-world
Optionally install pandoc to generate html reports:
sudo apt-get install pandoc
Optionally start “Docker Desktop” if installed (not required). Note:
“Docker Desktop” is not required to build and run sick_scan_xd in docker container, and
depending on your system, it runs qemu-system-x86 with high cpu and memory load.
Build and run all sick_scan_xd docker tests on Linux
Script run_all_dockertests_linux.bash in folder sick_scan_xd/test/docker builds docker images for x64, ROS1 and ROS2 on Linux und runs all dockertests.
NOTE: Although ROS1 is still mentioned below, active development for ROS1 will not be continued.
Create a workspace folder (e.g. sick_scan_ws or any other name) and clone the sick_scan_xd repository:
mkdir -p ./sick_scan_ws/src
cd ./sick_scan_ws/src
git clone -b develop https://github.com/SICKAG/sick_scan_xd.git```
Build and run all sick_scan_xd docker images and tests:
cd sick_scan_xd/test/docker
sudo chmod a+x ./*.bash
./run_all_dockertests_linux.bash
echo -e "docker test status = $?"
After successful build and run, the message SUCCESS: sick_scan_xd docker test passed will be displayed. Otherwise an error message ERROR: sick_scan_xd docker test FAILED is printed.
Dockerfiles to create linux docker images are provided in folder sick_scan_xd/test/docker/dockerfiles:
Dockerfile |
System |
|---|---|
dockerfile_linux_x64_develop |
ubuntu 22.04 + cmake + python modules |
dockerfile_linux_ros1_noetic_develop - EOL |
No longer supported - EOL - ubuntu 20.04 + ROS1 noetic + python modules |
dockerfile_linux_ros2_humble_develop |
ubuntu 22.04 + ROS2 humble + python modules |
dockerfile_sick_scan_xd/linux_x64 |
linux_x64_develop + sick_scan_xd |
dockerfile_sick_scan_xd/ros1_noetic |
linux_ros1_noetic_develop + sick_scan_xd |
dockerfile_sick_scan_xd/ros2_humble |
linux_ros2_humble_develop + sick_scan_xd |
The following chapter gives a more detailed description of the build and run process for ROS1/Linux. The same process applies accordingly for dockertests of the C++ API, the Python API and ROS-2.
Build and run sick_scan_xd for ROS 1 noetic
This section describes how to
build a docker image with ROS1 noetic on Linux
build sick_scan_xd in the docker image
run and test sick_scan_xd in the docker container
sick_scan_xd can be build from local sources, from git sources or it can be installed from prebuilt binaries.
Build and run with sick_scan_xd from local sources
The following instructions
build a docker image with ROS1 noetic on Linux,
build sick_scan_xd in the docker image from local sources, and
run and test sick_scan_xd in the docker container against a multiScan100 emulator.
This is the recommended way for
testing locally modified sick_scan_xd sources (e.g. pre-release tests), or
testing sick_scan_xd with sources cloned from a public gitlab or github repository (e.g. branch tests), or
testing sick_scan_xd with sources cloned from a git repository requiring authentification.
Run the following steps to build and run sick_scan_xd for ROS1 noetic in a docker container on Linux:
Create a workspace folder, e.g.
sick_scan_ws(or any other name):mkdir -p ./sick_scan_ws cd ./sick_scan_ws
Clone repository https://github.com/SICKAG/sick_scan_xd:
mkdir ./src
pushd ./src
git clone -b master https://github.com/SICKAG/sick_scan_xd.git
popd
If you want to test sources from a different branch or repository, just replace the git call resp. the git url. If you want to test sources not yet released, just provide the modified sources in the src-folder.
Unzip
test/docker/data.zipinto foldertest/docker/dataCreate a docker image named
sick_scan_xd/ros1_noeticfrom dockerfile src/sick_scan_xd/test/docker/dockerfiles/dockerfile_linux_ros1_noetic_sick_scan_xd with local sources in folder./src/sick_scan_xd:docker build --progress=plain -t sick_scan_xd/ros1_noetic -f ./src/sick_scan_xd/test/docker/dockerfiles/dockerfile_linux_ros1_noetic_sick_scan_xd . docker images -a # list all docker images
Run docker image
sick_scan_xd/ros1_noeticand test sick_scan_xd with a simulated multiScan100 lidar:Allow docker to display rviz
xhost +local:docker
Run sick_scan_xd simulation in docker container sick_scan_xd/ros1_noetic
docker run -it --name sick_scan_xd_container -v /tmp/.X11-unix:/tmp/.X11-unix --env=DISPLAY -w /workspace sick_scan_xd/ros1_noetic python3 ./src/sick_scan_xd/test/docker/python/sick_scan_xd_simu.py --ros=noetic --cfg=./src/sick_scan_xd/test/docker/data/multiscan_compact_test01_cfg.json
Check docker exit status (0: success, otherwise error)
docker_exit_status=$?
echo -e "docker_exit_status = $docker_exit_status"
if [ $docker_exit_status -eq 0 ] ; then echo -e "\nSUCCESS: sick_scan_xd docker test passed\n" ; else echo -e "\n## ERROR: sick_scan_xd docker test FAILED\n" ; fi
If all tests were passed, i.e. all expected Pointcloud-, Laserscan- and IMU-messages have been verified, docker returns with exit status 0 and the message
SUCCESS: sick_scan_xd docker test passedis displayed. Otherwise docker returns with an error code and the message## ERROR: sick_scan_xd docker test FAILEDis displayed.To optionally cleanup and uninstall all containers and images, run the following commands:
docker ps -a -q # list all docker container
docker stop $(docker ps -a -q)
docker rm $(docker ps -a -q)
docker system prune -a -f
docker volume prune -f
docker images -a # list all docker images
Remove all docker images if needed. As a general rule, the images do not need to be deleted. Therefore, the following point should be skipped by default.
docker rmi -f $(docker images -a) # Usually not needed. Therefore skip it by default.
This will remove all docker logfiles, images, containers and caches.
Build and run with sick_scan_xd sources from a git repository
By default, sick_scan_xd sources are provided in the local folder ./src/sick_scan_xd. This source folder is just copied into the docker image and used to build sick_scan_xd. This step is executed by the COPY command in the dockerfile:
COPY ./src/sick_scan_xd /workspace/src/sick_scan_xd
This docker command copies the local folder ./src/sick_scan_xd into the docker image (destination folder in the docker image is /workspace/src/sick_scan_xd). This default option is useful to test new sick_scan_xd versions or release candidates before check in, or to test a local copy of sick_scan_xd from sources requiring authorization.
Alternatively, docker can build sick_scan_xd from a public git repository like https://github.com/SICKAG/sick_scan_xd. A git repository can be set by docker build option --build-arg SICK_SCAN_XD_GIT_URL=<sick_scan_xd-git-url>, e.g. --build-arg SICK_SCAN_XD_GIT_URL=https://github.com/SICKAG/sick_scan_xd. Replace the docker build .... command in step 3 by:
Create a docker image named “sick_scan_xd/ros1_noetic” from dockerfile “./sick_scan_xd/test/docker/dockerfiles/dockerfile_linux_ros1_noetic_sick_scan_xd” with github sources from https://github.com/SICKAG/sick_scan_xd
docker build --build-arg SICK_SCAN_XD_GIT_URL=https://github.com/SICKAG/sick_scan_xd --progress=plain -t sick_scan_xd/ros1_noetic -f ./src/sick_scan_xd/test/docker/dockerfiles/dockerfile_linux_ros1_noetic_sick_scan_xd .
If option SICK_SCAN_XD_GIT_URL is set, the docker build command in the dockerfile clones the given repository:
RUN /bin/bash -c "if [ $SICK_SCAN_XD_GIT_URL != $NONE ] ; then ( pushd /workspace/src ; rm -rf ./sick_scan_xd ; git clone -b master $SICK_SCAN_XD_GIT_URL ; popd ) ; fi"
After a successful build, run and test sick_scan_xd in the docker container as described above in step 4:
xhost +local:docker
docker run -it --name sick_scan_xd_container -v /tmp/.X11-unix:/tmp/.X11-unix --env=DISPLAY -w /workspace sick_scan_xd/ros1_noetic python3 ./src/sick_scan_xd/test/docker/python/sick_scan_xd_simu.py --ros=noetic --cfg=./src/sick_scan_xd/test/docker/data/multiscan_compact_test01_cfg.json
Build and run with prebuilt sick_scan_xd binaries
Alternatively, docker can install a prebuild sick_scan_xd binary using apt-get, e.g. apt-get install -y ros-noetic-sick-scan-xd. Use docker build options --build-arg SICK_SCAN_XD_APT_PKG=ros-noetic-sick-scan-xd --build-arg SICK_SCAN_XD_BUILD_FROM_SOURCES=0 to install a prebuild sick_scan_xd binary in the docker image, e.g.
Create a docker image named “sick_scan_xd/ros1_noetic” from dockerfile “./sick_scan_xd/test/docker/dockerfiles/dockerfile_linux_ros1_noetic_sick_scan_xd” with “apt-get install ros-noetic-sick-scan-xd”
docker build --build-arg SICK_SCAN_XD_APT_PKG=ros-noetic-sick-scan-xd --build-arg SICK_SCAN_XD_BUILD_FROM_SOURCES=0 --progress=plain -t sick_scan_xd/ros1_noetic -f ./src/sick_scan_xd/test/docker/dockerfiles/dockerfile_linux_ros1_noetic_sick_scan_xd .
After a successful build, run and test sick_scan_xd in the docker container as described above in step 4:
xhost +local:docker
docker run -it --name sick_scan_xd_container -v /tmp/.X11-unix:/tmp/.X11-unix --env=DISPLAY -w /workspace sick_scan_xd/ros1_noetic python3 ./src/sick_scan_xd/test/docker/python/sick_scan_xd_simu.py --ros=noetic --cfg=./src/sick_scan_xd/test/docker/data/multiscan_compact_test01_cfg.json
To install other prebuilt sick_scan_xd binaries, replace command apt-get install -y $SICK_SCAN_XD_APT_PKG in the dockerfile by a customized procedure.
Docker on Windows
Download and install the Docker Desktop https://desktop.docker.com/win/main/amd64/Docker%20Desktop%20Installer.exe and run “Docker Desktop” as admin.
Note:
The windows version of the docker container must match the windows version on the docker host.
Hyper-V must be enabled, see https://learn.microsoft.com/en-us/virtualization/hyper-v-on-windows/quick-start/enable-hyper-v
Docker must be set to use Windows containers, not the default Linux containers:
Open Settings in Docker Desktop and disable WSL (“Use the WSL 2 based engine”: OFF)
Run
"%ProgramFiles%\Docker\Docker\DockerCli.exe" -SwitchDaemon .
If you encounter errors during windows or package installation, check or disable anti-virus software and try again.
Docker commands
docker system prune -aanddocker volume prune -fremove all container and might help in case of problems.Building a Windows docker image incl. Visual Studio Compiler may take several hours. Take care of your newly created docker image, do not delete it if you do not have to!
Use
docker image save -o images.tar image1 [image2 ...]to save any images you want to keep to a local tar file.Use
use docker image load -i images.tarto restore previously saved images.Docker uploads a complete copy of the working directory to the docker daemon when running
docker build. Exclude large folders using a.dockerignorefile. The.dockerignorefile must be in the current working directory when runningdocker build. Copysick_scan_xd\.dockerignoreif you are executingdocker buildin another folder.
Dockerfiles to create a windows docker image are provided in folder sick_scan_xd/test/docker/dockerfiles:
Dockerfile |
System |
|---|---|
dockerfile_windows_x64_buildtools |
Windows core (mcr.microsoft.com/windows) + build tools incl. Visual Studio compiler (vs_buildtools) |
dockerfile_windows_x64_develop |
windows_x64_buildtools + vcpkg + jsoncpp + cmake + python |
dockerfile_windows_x64_sick_scan_xd |
windows_x64_develop + sick_scan_xd |
dockerfile_windows_dotnet48_buildtools |
Windows core with .NET 4.8 (required by chocolatey and ROS2) + build tools incl. Visual Studio compiler (vs_buildtools) |
dockerfile_windows_dotnet48_develop |
windows_dotnet48_buildtools + chocolatey + cmake + python |
dockerfile_windows_dotnet48_ros2_foxy EOL |
no longer supported - End of Life - windows_dotnet48_develop + ROS2 foxy |
dockerfile_windows_dotnet48_ros2_humble |
windows_dotnet48_develop + ROS2 humble |
dockerfile_windows_dotnet48_ros2_sick_scan_xd |
windows_dotnet48_ros2_humble + sick_scan_xd |
Build and run sick_scan_xd dockertests on Windows
Start docker desktop and load docker images windows_x64_develop.tar and windows_dotnet48_ros2_humble.tar:
docker image load -i windows_x64_develop.tar
docker image load -i windows_dotnet48_ros2_humble.tar
If you do not have these docker images, run build_dockerimage_windows_x64_sick_scan_xd.cmd in folder sick_scan_xd/test/docker to build them. Note that the Windows docker build process is very timeconsuming; using existing docker images is therefore recommended.
Script run_all_dockertests_windows.cmd in folder sick_scan_xd/test/docker builds the docker image for Windows und runs all dockertests:
REM Create a workspace folder (e.g. sick_scan_ws or any other name) and clone the sick_scan_xd repository:
mkdir sick_scan_ws\src
cd sick_scan_ws\src
git clone -b develop https://github.com/SICKAG/sick_scan_xd.git
REM Build and run all sick_scan_xd docker images and tests:
cd sick_scan_xd\test\docker
run_all_dockertests_windows.cmd
After successful build and run, the message SUCCESS: sick_scan_xd docker test passed will be displayed. Otherwise an error message ERROR: sick_scan_xd docker test FAILED is printed.
Docker configuration
The docker container currently supports sick_scan_xd testing with ROS 1 noetic on Linux with a multiScan100, picoScan100 and MRS1000 emulators. Python script sick_scan_xd_simu.py runs the following steps to verify sick_scan_xd:
starts a tiny SOPAS test server to emulate SOPAS responses of a multiScan100, picoScan100 or MRS1000,
launches sick_scan_xd,
starts rviz to display pointclouds and laserscan messages,
replays UDP packets with scan data, which previously have been recorded and converted to json-file,
receives the pointcloud-, laserscan- and IMU-messages published by sick_scan_xd,
compares the received messages to predefined reference messages,
checks against errors and verifies complete and correct messages, and
returns status 0 for success or an error code in case of any failures.
The following screenshot shows an example of a successful sick_scan_xd multiScan100 test in a docker container:

Test configuration
Test cases are configured by a json file. Currently sick_scan_xd provides configuration files for docker tests for the following lidars:
multiScan100 docker test: multiscan_compact_test01_cfg.json
picoScan100 docker test: picoscan_compact_test01_cfg.json
LMS1xx docker test: lms1xx_test01_cfg.json
LMS1000 docker test: lms1xxx_test01_cfg.json
LMS4000 docker test: lms4xxx_test01_cfg.json
LMS5xx docker test: lms5xx_test01_cfg.json
LD-LRS36x0 docker test: lrs36x0_test01_cfg.json
LD-LRS36x1 docker test: lrs36x1_test01_cfg.json
LRS4000 docker test: lrs4xxx_test01_cfg.json
MRS1000 docker test: mrs1xxx_test01_cfg.json
MRS6000 docker test: mrs6xxx_test01_cfg.json
NAV2xx/3xx docker test: nav350_test01_cfg.json
LD-OEM15xx docker test: oem15xx_test01_cfg.json
RMS1000/RS2000 docker test: rmsxxxx_test01_cfg.json
TiM240 docker test: tim240_test01_cfg.json
TiM4xx docker test: tim4xx_test01_cfg.json
TiM5xx docker test: tim5xx_test01_cfg.json
TiM7xx docker test: tim7xx_test01_cfg.json
TiM7xxS docker test: tim7xxs_test01_cfg.json
To execute these test cases in a Linux noetic docker container, run the following commands:
Test sick_scan_xd against multiScan100 emulator
docker run -it --name sick_scan_xd_container_multiscan_compact_test01 -v /tmp/.X11-unix:/tmp/.X11-unix --env=DISPLAY -w /workspace sick_scan_xd/ros1_noetic python3 ./src/sick_scan_xd/test/docker/python/sick_scan_xd_simu.py --ros=noetic --cfg=./src/sick_scan_xd/test/docker/data/multiscan_compact_test01_cfg.json
Test sick_scan_xd against multiScan100 emulator
docker run -it --name sick_scan_xd_container_picoscan_compact_test01 -v /tmp/.X11-unix:/tmp/.X11-unix --env=DISPLAY -w /workspace sick_scan_xd/ros1_noetic python3 ./src/sick_scan_xd/test/docker/python/sick_scan_xd_simu.py --ros=noetic --cfg=./src/sick_scan_xd/test/docker/data/picoscan_compact_test01_cfg.json
Test sick_scan_xd against MRS1000 emulator
docker run -it --name sick_scan_xd_container_mrs1xxx_test01 -v /tmp/.X11-unix:/tmp/.X11-unix --env=DISPLAY -w /workspace sick_scan_xd/ros1_noetic python3 ./src/sick_scan_xd/test/docker/python/sick_scan_xd_simu.py --ros=noetic --cfg=./src/sick_scan_xd/test/docker/data/mrs1xxx_test01_cfg.json
Use the configuration files as a template for new test cases resp. different devices if required. Visualization with rviz is deactivated by default. Use sick_scan_xd_simu.py option --run_rviz=1 to activate rviz visualization for development or debugging.
Configuration of error test cases
In addition to the test cases above, some exemplary error test cases are provided for docker tests:
multiScan100 error test: multiscan_compact_errortest01_cfg.json - this test case simulates a multiScan100 error (lidar does not send scan data)
picoScan100 error test: picoscan_compact_errortest01_cfg.json - this test case simulates a network error (picoScan100 not reachable, no tcp connection and lidar does not respond to SOPAS requests)
Note that these configurations causes the docker test to fail and result in the status TEST FAILED.
Data export from docker container
Use command docker cp <container_id>:<src_path> <local_dst_path> to export all sick_scan_xd logfiles from the docker container:
Export sick_scan_xd output folder from docker container to local folder ./log/sick_scan_xd_simu
docker ps -a # list all container
mkdir -p ./log
docker cp $(docker ps -aqf "name=sick_scan_xd_container_multiscan_compact_test01"):/workspace/log/sick_scan_xd_simu ./log
docker cp $(docker ps -aqf "name=sick_scan_xd_container_picoscan_compact_test01"):/workspace/log/sick_scan_xd_simu ./log
docker cp $(docker ps -aqf "name=sick_scan_xd_container_mrs1xxx_test01"):/workspace/log/sick_scan_xd_simu ./log
After successful test and data export, the sick_scan_xd container can be deleted by
docker rm $(docker ps -aqf "name=sick_scan_xd_container_multiscan_compact_test01")
docker rm $(docker ps -aqf "name=sick_scan_xd_container_picoscan_compact_test01")
docker rm $(docker ps -aqf "name=sick_scan_xd_container_mrs1xxx_test01")
Alternatively, use command docker rm $(docker ps -aq) to delete all docker container.
Test reports
Each docker test saves logfiles and json files and generates a test report in log folder /workspace/log/sick_scan_xd_simu/<date_time> with <date_time> in format <YYYYMMDD_hhmmss>. Script run_dockerfile_linux_ros1_noetic_sick_scan_xd.bash runs all docker tests and converts the test reports to html with pandoc. Use the commands above to copy the log folder from the docker container to your local host and open file log/sick_scan_xd_simu/sick_scan_xd_testreport.md.html in a browser. The following screenshot shows a test summary and a test report of a successful multiScan100 docker test:


Data preparation
Both scan data and reference messages must be prepared and provided for testing sick_scan_xd. Scan data is typically captured by Wireshark and converted to json. They are replayed by multiscan_pcap_player.py resp.sopas_json_test_server.py during testing to emulate a lidar. Reference messages are used to verify the poin tcloud-, laserscan- and optional IMU-messages published by sick_scan_xd. They can be generated by saving the messages of a successful test. In this case the messages must be manually checked e.g. by using rviz. Make sure that the messages saved as a reference are correct, i.e. rviz displays the point clouds and laserscans correctly and consistent with the real scene observed by the lidar. This section describes how to record and convert these data.
Scan data preparation
Run the following steps to prepare scan data for sick_scan_xd testing:
Record scan data using Wireshark:
Install sick_scan_xd
Connect the device, e.g. multiScan100
Start Wireshark
Run sick_scan_xd, e.g. on Linux with ROS-1 by
roslaunch sick_multiscan.launch hostname:="192.168.0.1" udp_receiver_ip:="192.168.0.100"Check point clouds and laserscans with
rvizSave the network traffic in a pcapng-file by Wireshark
For multiScan100 and picoScan100: Play the pcapng-file for a short time (e.g. 1 second) using multiscan_pcap_player.py and save UDP packets in a json file. Example to convert the recorded pcapng-file
20231009-multiscan-compact-imu-01.pcapngto json-filemultiscan_compact_test01_udp_scandata.json:python3 ./src/sick_scan_xd/test/python/multiscan_pcap_player.py --pcap_filename=./src/sick_scan_xd/test/emulator/scandata/20231009-multiscan-compact-imu-01.pcapng --udp_port=-1 --repeat=1 --verbose=0 --filter=pcap_filter_multiscan_hildesheim --max_seconds=1 --save_udp_jsonfile=./src/sick_scan_xd/test/docker/data/multiscan_compact_test01_udp_scandata.json
Example to convert the recorded pcapng-file
20230911-picoscan-compact.pcapngto json-filepicoscan_compact_test01_udp_scandata.json:python3 ./src/sick_scan_xd/test/python/multiscan_pcap_player.py --pcap_filename=./src/sick_scan_xd/test/emulator/scandata/20230911-picoscan-compact.pcapng --udp_port=-1 --repeat=1 --verbose=0 --filter=pcap_filter_multiscan_hildesheim --max_seconds=1 --save_udp_jsonfile=./src/sick_scan_xd/test/docker/data/picoscan_compact_test01_udp_scandata.json
For lidars using SOPAS LMDscandata over TCP (e.g. MRS1000): Convert the pcapng-file to json file with pcap_json_converter.py. Example for MRS1000:
python3 ./src/sick_scan_xd/test/pcap_json_converter/pcap_json_converter.py --pcap_filename=./src/sick_scan_xd/test/emulator/scandata/20211201_MRS_1xxx_IMU_with_movement.pcapng
mv ./src/sick_scan_xd/test/emulator/scandata/20211201_MRS_1xxx_IMU_with_movement.pcapng.json ./src/sick_scan_xd/test/docker/data/mrs1xxx_test01_tcp_data.json
Generation of reference messages
Run the following steps to generate reference messages for sick_scan_xd testing:
Build sick_scan_xd for ROS1 as described in “Build on Linux ROS1” and start environment:
source /opt/ros/noetic/setup.bash
source ./devel_isolated/setup.bash
roscore &
rviz &
Run sick_scan_xd_simu.py and save messages in a json-file. Example for a multiScan100 test case:
python3 ./src/sick_scan_xd/test/docker/python/sick_scan_xd_simu.py --ros=noetic --save_messages_jsonfile=received_messages.json --cfg=./src/sick_scan_xd/test/docker/data/multiscan_compact_test01_cfg.json
Example for a picoScan100 test case:
python3 ./src/sick_scan_xd/test/docker/python/sick_scan_xd_simu.py --ros=noetic --save_messages_jsonfile=received_messages.json --cfg=./src/sick_scan_xd/test/docker/data/picoscan_compact_test01_cfg.json
Example for a MRS1000 test case:
python3 ./src/sick_scan_xd/test/docker/python/sick_scan_xd_simu.py --ros=noetic --save_messages_jsonfile=received_messages.json --cfg=./src/sick_scan_xd/test/docker/data/mrs1xxx_test01_cfg.json --run_seconds=5
Make sure that the messages saved as a reference are correct, i.e. rviz displays the point clouds and laserscans correctly and consistent with the real scene observed by the lidar. For lidars with IMU data support, use
rostopic echo <imu topic>to verify plausible IMU data. Use parameter--run_seconds=<sec>to run the simulation as long as needed for the manual verification. For multiScan100 and picoScan100, increase parameter./src/sick_scan_xd/test/python/multiscan_pcap_player.py --repeat=<number of repetitions> ...in the configuration file to run longer simulations.After manual verification, rename the generated json-file
received_messages.jsonand use it as reference messages in your test configuration, e.g. multiscan_compact_test01_ref_messages.json for the multiScan100 test case.
Simulation
For unit tests without sensor hardware, a simple test server is provided. To build the test server, call either cmake with option -DCMAKE_ENABLE_EMULATOR=1, or activate cmake option ENABLE_EMULATOR in CMakeLists.txt. Then rebuild sick_scan_xd. By default, option ENABLE_EMULATOR is switched off. Please note that this just builds a simple test server for basic unit tests of sick_scan_xd drivers. Its purpose is to run basic tests and to help with diagnosis in case of issues. It does not emulate a real scanner. Simulation requires jsoncpp. Install with sudo apt-get install libjsoncpp-dev on Linux and with vcpkg install jsoncpp:x64-windows on Windows. You can find examples to test and run sick_scan_xd in offline mode in folder test/scripts. Their purpose is to demonstrate the usage of the sick_scan_xd driver. Please feel free to customize the scripts or use them as a starting point for own projects.
On Windows, add -DCMAKE_TOOLCHAIN_FILE=C:/vcpkg/scripts/buildsystems/vcpkg.cmake to instruct CMake to search for installed packages in the vcpkg environment.
Adjust this path if you have not installed vcpkg in C:/vcpkg.
Simulation on Linux
Run script run_simu_lms_5xx.bash in folder test/scripts or execute the following commands:
Start the test server:
python3 ./test/emulator/test_server.py --scandata_file=./test/emulator/scandata/20210302_lms511.pcapng.scandata.txt --scandata_frequency=20.0 --tcp_port=2112 &
sleep 1
Run sick_generic_caller.
On native Linux:
./build/sick_generic_caller ./launch/sick_lms_5xx.launch hostname:=127.0.0.1 sw_pll_only_publish:=False &
On Linux with ROS 1:
roslaunch sick_scan_xd sick_lms_5xx.launch hostname:=127.0.0.1 sw_pll_only_publish:=False &
On Linux with ROS 2:
ros2 run sick_scan_xd sick_generic_caller ./src/sick_scan_xd/launch/sick_lms_5xx.launch hostname:=127.0.0.1 sw_pll_only_publish:=False &
View the point cloud.
On native Linux: Open file
image_viewer.htmlin folderdemoin a browser (f.e. firefox) to view a jpg-image of the current scan.On Linux with ROS 1:
rosrun rviz rviz -d ./src/sick_scan_xd/test/emulator/config/rviz_emulator_cfg_lms5xx.rviz &
On Linux with ROS 2:
rviz2 -d ./src/sick_scan_xd/test/emulator/config/rviz2_lms5xx.rviz &
Further examples are provided in folder test/scripts.
Simulation on Windows
Run script run_simu_lms_5xx.cmd in folder test/scripts or execute the following commands:
Start the test server:
cd .\build
start "testserver" cmd /k python ../test/emulator/test_server.py --scandata_file=../test/emulator/scandata/20210302_lms511.pcapng.scandata.txt --scandata_frequency=20.0 --tcp_port=2112
@timeout /t 1
Run sick_generic_caller. On native Windows:
.\Debug\sick_generic_caller.exe ../launch/sick_lms_5xx.launch hostname:=127.0.0.1 sw_pll_only_publish:=False
On Windows with ROS 2:
ros2 run sick_scan_xd sick_generic_caller ./src/sick_scan_xd/launch/sick_lms_5xx.launch hostname:=127.0.0.1 sw_pll_only_publish:=False
Open file
image_viewer.htmlin folderdemoin your browser to view a jpg-image of the current scan.
Note, that python version 3 incl. runtime dlls must be accessible, f.e. by extending the PATH environment variable:
set PYTHON_DIR=%ProgramFiles(x86)%/Microsoft Visual Studio/Shared/Python37_64
set PATH=%PYTHON_DIR%;%PYTHON_DIR%/Scripts;c:\vcpkg;%PATH%
Further examples are provided in folder test/scripts.
Profiling
Since the existing node can basically be used on different platforms, bottlenecks can occur with weak hardware. To better analyze these bottlenecks, software profiling can be performed. The following example shows how to perform profiling. For further details on profiling, please refer to https://baptiste-wicht.com/posts/2011/09/profile-c-application-with-callgrind-kcachegrind.html, for example.
Installation
First of all, you need to install Callgrind and KCachegrind. You also need to install graphviz in order to view the call graph in KCachegrind. The applications are already packaged for the most important Linux distributions. You can just use apt-get to install them:
sudo apt-get install valgrind kcachegrind graphviz
Usage
We have to start by profiling the application with Callgrind. To profile an application with Callgrind, you just have to prepend the Callgrind invocation in front of your normal program invocation:
valgrind --tool=callgrind program [program_options]
In order to establish a reference to the source code during profiling, the program must be compiled with debug symbols, this can be done with catkin_make
catkin_make install -DCMAKE_BUILD_TYPE=Debug
It is necessary to create a rosmaster so that the sick_scan_xd node can connect to it because we can’t use roslaunch during profiling.
roscore
To set the parameters we start a node as usual with roslaunch.
roslaunch sick_scan_xd sick_lms_5xx.launch hostname:=192.168.0.151
While this node is running we can use ps -aef| grep sick_scan_xd to determine the program path and the call parameters.
rosuser@ROS-NB:~$ ps -aef|grep sick_scan_xd
rosuser   4839  2443  0 14:43 pts/1    00:00:00 /usr/bin/python /opt/ros/melodic/bin/roslaunch sick_scan_xd sick_lms_5xx.launch hostname:=192.168.0.151
rosuser   4854  4839  1 14:43 ?        00:00:03 /home/rosuser/ros_catkin_ws/devel/lib/sick_scan_xd/sick_generic_caller __name:=sick_lms_5xx __log:=/home/rosuser/.ros/log/f9861670-304c-11e9-9839-54e1ad2921b6/sick_lms_5xx-1.log
rosuser   4910  4875  0 14:46 pts/6    00:00:00 grep --color=auto sick_scan_xd
now we can close the node and restart with callgrid
valgrind --tool=callgrind program /home/rosuser/ros_catkin_ws/devel/lib/sick_scan_xd/sick_generic_caller __name:=sick_lms_5xx
The result will be stored in a callgrind.out.XXX file where XXX will be the process identifier. You can read this file using a text editor, but it won’t be very useful because it’s very cryptic. That’s why KCacheGrind will be useful. You can launch KCacheGrind using command line or in the program menu if your system installed it here. Then, you have to open your profile file. The first view present a list of all the profiled functions. You can see the inclusive and the self cost of each function and the location of each one.
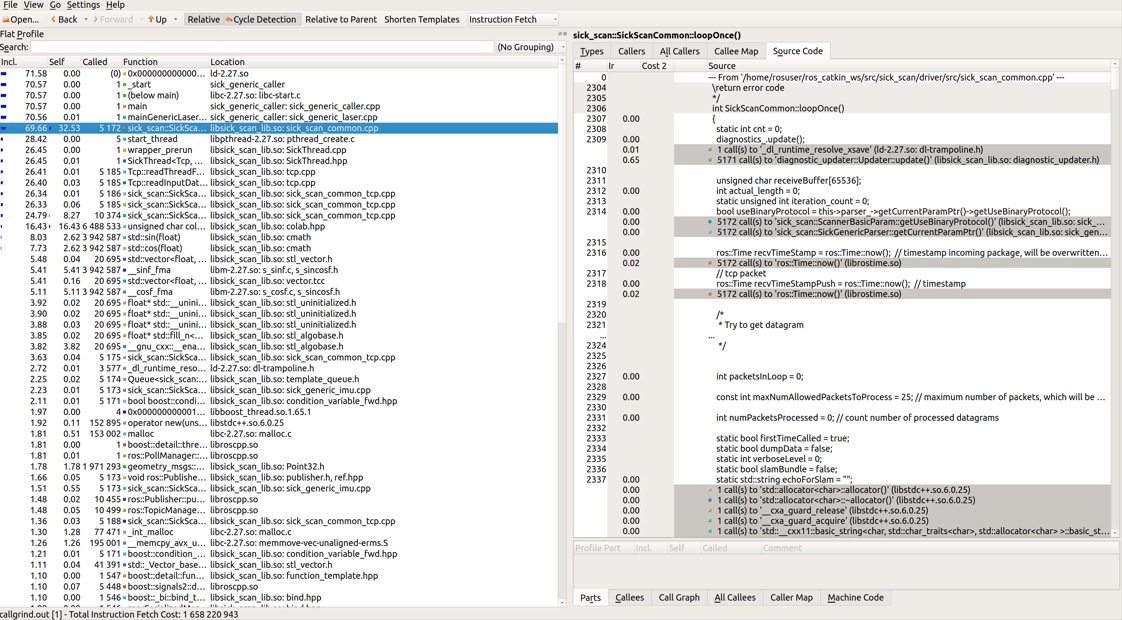
Once you click on a function, the other views are filled with information. The view in upper right part of the window gives some information about the selected function.
The view have several tabs presenting different information:
Types : Present the types of events that have been recorded. In our case, it’s not really interesting, it’s just the number of instructions fetch
Callers : List of the direct callers.
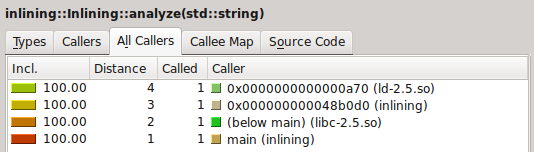
All Callers : List of all the callers, it seems the callers and the callers of the callers.
Callee Map : A map of the callee, personally, I do not really understand this view, but it’s a kind of call graph representing the cost of the functions.
Source code : The source code of the function if the application has been compiled with the debug symbol.
And finally, you have another view with data about the selected function.
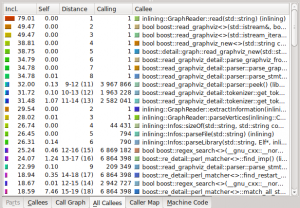
Again, several tabs:
Callees : The direct callees of the function
Call Graph : The call graph from the function to the end
All Callees : All the callees and the callees of the callees
Caller Map : All functions are represented as blocks the size corresponds to their CPU time. Callees are stacked on the callers.
Machine Code : The machine code of the function if the application has been profiled with –dump-instr=yes option
You have also several display options and filter features to find exactly what you want and display it the way you want.
The information provided by KCacheGrind can be very useful to find which functions takes too much time or which functions are called too much. This text is an adopted version of https://baptiste-wicht.com/posts/2011/09/profile-c-application-with-callgrind-kcachegrind.html. Thanks to Baptiste Wicht.