Warning
You're reading the documentation for a version of ROS 2 that has reached its EOL (end-of-life), and is no longer officially supported.
If you want up-to-date information, please have a look at Kilted.
Use quality-of-service settings to handle lossy networks
Background
Please read the documentation page about QoS settings for background information on available support in ROS 2.
In this demo, we will spawn a node that publishes a camera image and another that subscribes to the image and shows it on the screen. We will then simulate a lossy network connection between them and show how different quality of service settings handle the bad link.
Prerequisites
This tutorial assumes you have a working ROS 2 installation and OpenCV.
See the OpenCV documentation for its installation instructions.
You will also need the ROS package image_tools.
sudo apt-get install ros-dashing-image-tools
# Clone and build the demos repo using the branch that matches your installation
git clone https://github.com/ros2/demos.git -b dashing
Run the demo
Before running the demo, make sure you have a working webcam connected to your computer.
Once you’ve installed ROS 2, source your setup file:
. <path to ROS 2 install space>/setup.bash
. <path to ROS 2 install space>/setup.bash
call <path to ROS 2 install space>/local_setup.bat
Then run:
ros2 run image_tools showimage
Nothing will happen yet.
showimage is a subscriber node that is waiting for a publisher on the image topic.
Note: you have to close the showimage process with Ctrl-C later.
You can’t just close the window.
In a separate terminal, source the install file and run the publisher node:
ros2 run image_tools cam2image
This will publish an image from your webcam. In case you don’t have a camera attached to your computer, there is a commandline option which publishes predefined images.
#Using CLI arguments instead of parameters:
ros2 run image_tools cam2image -b
In this window, you’ll see terminal output:
Publishing image #1
Publishing image #2
Publishing image #3
...
A window will pop up with the title “view” showing your camera feed. In the first window, you’ll see output from the subscriber:
Received image #1
Received image #2
Received image #3
...
Note
macOS users: If these examples do not work or you receive an error like ddsi_conn_write failed -1 then you’ll need to increase your system wide UDP packet size:
$ sudo sysctl -w net.inet.udp.recvspace=209715
$ sudo sysctl -w net.inet.udp.maxdgram=65500
These changes will not persist a reboot. If you want the changes to persist, add these lines to /etc/sysctl.conf (create the file if it doesn’t exist already):
net.inet.udp.recvspace=209715
net.inet.udp.maxdgram=65500
Command line options
In one of your terminals, add a -h flag to the original command:
ros2 run image_tools showimage -- -h
Add network traffic
Warning
This section of the demo won’t work on RTI’s Connext DDS. When running multiple nodes in the same host, the RTI Connext implementation uses shared memory along with the loopback interface. Degrading the loopback interface throughput won’t affect shared memory, thus traffic between the two nodes won’t be affected. See RMW implementation code and RTI Connext Documentation for further reference.
Note
This next section is Linux-specific.
However, for macOS and Windows you can achieve a similar effect with the utilities “Network Link Conditioner” (part of the xcode tool suite) and “Clumsy” (http://jagt.github.io/clumsy/index.html), respectively, but they will not be covered in this tutorial.
We are going to use the Linux network traffic control utility, tc (http://linux.die.net/man/8/tc).
sudo tc qdisc add dev lo root netem loss 5%
This magical incantation will simulate 5% packet loss over the local loopback device.
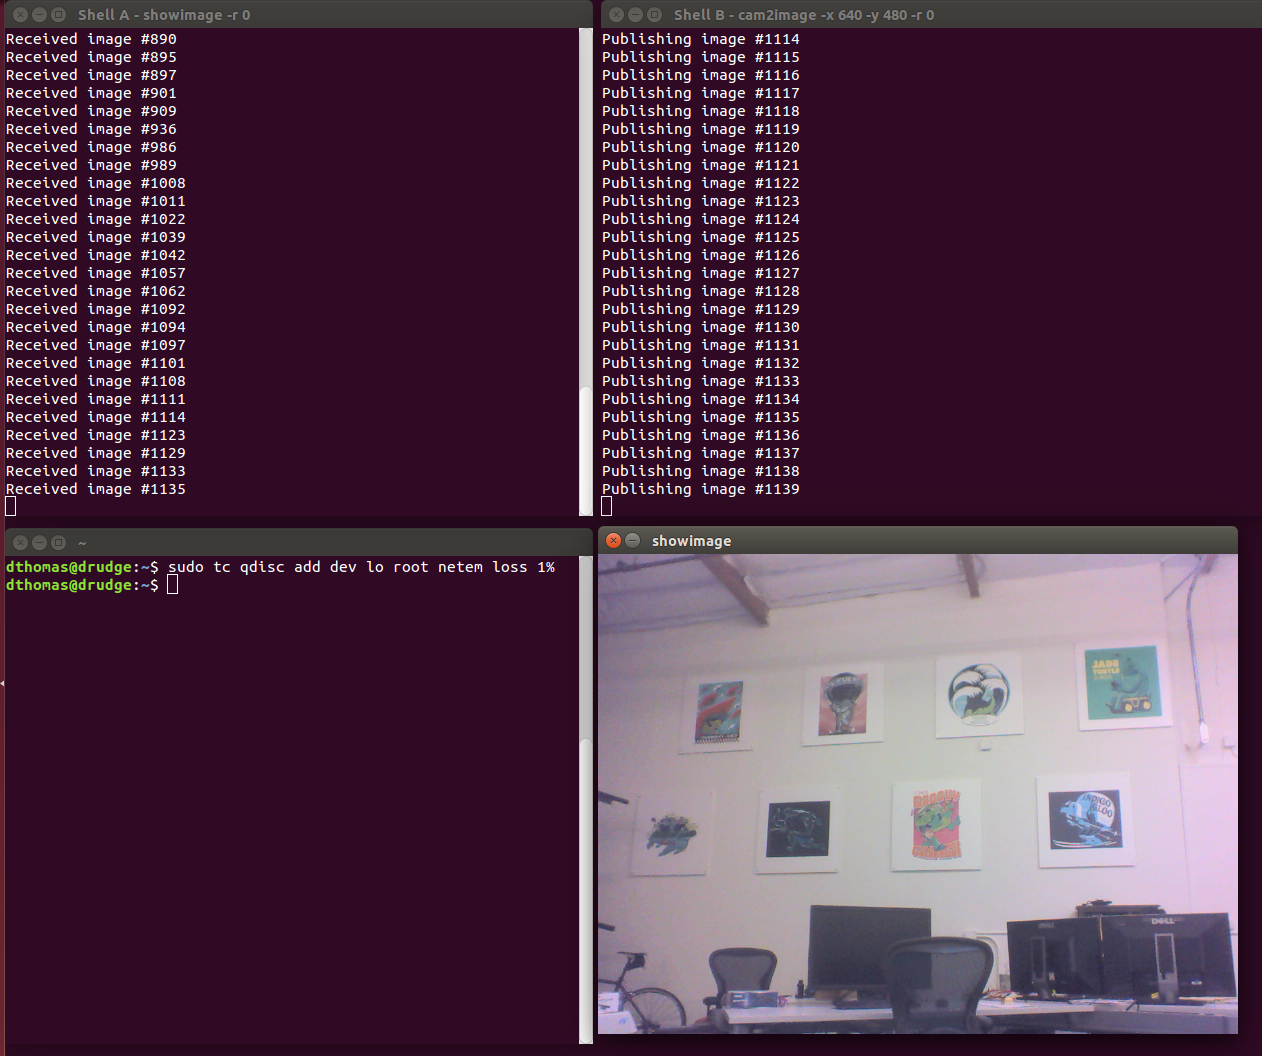
If you use a higher resolution of the images (e.g. --ros-args -p width:=640 -p height:=480) you might want to try a lower packet loss rate (e.g. 1%).
Next we start the cam2image and showimage, and we’ll soon notice that both programs seem to have slowed down the rate at which images are transmitted.
This is caused by the behavior of the default QoS settings.
Enforcing reliability on a lossy channel means that the publisher (in this case, cam2image) will resend the network packets until it receives acknowledgement from the consumer (i.e. showimage).
Let’s now try running both programs, but with more suitable settings.
First of all, we’ll use the -p reliability:=best_effort option to enable best effort communication.
The publisher will now just attempt to deliver the network packets, and don’t expect acknowledgement from the consumer.
We see now that some of the frame on the showimage side were dropped, the frame numbers in the shell running showimage won’t be consecutive anymore:
Note
In Dashing, use -x 640 -y 480 for changing the resolution and -r 0 for best effort communication.

When you’re done, remember to delete the queueing discipline:
sudo tc qdisc delete dev lo root netem loss 5%