eCAL in Docker
Here we will show how to deploy eCAL into a docker container, and how to use its image from other containers.
Important
This will work with eCAL 5.10 and up. Older eCAL versions will lack Shared Memory communication when being run in a docker container.
Prerequisite
Install Docker as described in the Docker installation documentation
See also
If you have problems regarding to the installation, check these links:
Optional: If you want your docker container to talk to eCAL Nodes on other machines: Set up you multicast routes on the host.
Optional: If you want to use eCAL on your host to subscribe to data from your docker containers: Install eCAL on the host.
Getting Started
In this tutorial we are going to create:
A general purpose eCAL Docker container
A publisher container with a custom Hello World Publisher
A subscriber container receiving the Hello World data.
The file hierarchy that we are going to follow:
|fa-folder-open| ecal_in_docker ├─ |fa-file-alt|docker-compose.yaml| ├─ |fa-folder-open| ecal_runtime_container | └─ |fa-file-alt|Dockerfile| ├─ |fa-folder-open| pub_container | ├─ |fa-file-alt|Dockerfile| ├─ |fa-file-alt|CMakeLists.txt| └─ |fa-file-alt|main.cpp| └─ |fa-folder-open| sub_container ├─ |fa-file-alt|Dockerfile├─ |fa-file-alt|CMakeLists.txt└─ |fa-file-alt|main.cpp
eCAL runtime container
Create the file |fa-file-alt|
ecal_runtime_container/Dockerfileand paste the following installation commands:1# Base image: 2FROM ubuntu:focal 3 4# Install eCAL from PPA: 5RUN apt-get update && \ 6 apt-get install -y software-properties-common && \ 7 rm -rf /var/lib/apt/lists/* 8RUN add-apt-repository ppa:ecal/ecal-latest 9RUN apt-get install -y ecal 10 11# Install dependencies for compiling the hello world examples. 12# You can omit this, if you don't want to build applications in the container. 13RUN apt-get install -y cmake g++ libprotobuf-dev protobuf-compiler 14 15# Set network_enabled = true in ecal.ini. 16# You can omit this, if you only need local communication. 17RUN awk -F"=" '/^network_enabled/{$2="= true"}1' /etc/ecal/ecal.ini > /etc/ecal/ecal.tmp && \ 18 rm /etc/ecal/ecal.ini && \ 19 mv /etc/ecal/ecal.tmp /etc/ecal/ecal.ini 20 21# Print the eCAL config 22RUN ecal_config
Build the image:
cd ecal_in_docker
sudo docker build . --rm -t ecal-runtime
Test the image
sudo docker run --rm -it --ipc=host --pid=host --network=host ecal-runtime
At this point you are in the docker container. You can exit it with
exit. If you runecal_sample_person_sndin the docker container and have an eCAL installation on your host, you can subscribe to the data via the eCAL Monitor orecal_sample_person_rec.Note
--ipc=hostwill enable Shared Memory communication with your host system and other docker containers that are started with the same parameter. This is important for local communication.--network=hostwill share the host’s network. This is important for network communcation with other machines. It is also important for local shared memory communication, as it affects the hostname of the container. The hostname is used to determine whether an eCAL topic is avaialble via shared memory.--pid=hostwill share the Process-ID range with the host. Otherwise processes from different containers may get the same Process ID, which will prevent communication between those two processes.
Publisher container
The publisher container will be built on top of the ecal-runtime container.
It will contain the Hello World Sample from the Getting Started Section.
Create a file |fa-file-alt|
pub_container/Dockerfileand paste the following content:1#ecal base image: 2FROM ecal-runtime 3 4WORKDIR /src/pub 5 6COPY CMakeLists.txt main.cpp ./ 7RUN cmake . && make 8CMD ./hello_world_snd
Create publisher source code: |fa-file-alt|
pub_container/main.cppCreate file |fa-file-alt|
pub_container/CMakeLists.txtBuild the image:
cd pub_container
sudo docker build . --rm -t ecal-publisher:1.0.0
Subscriber container
The subscriber container will also be based on the ecal-runtime container and contain the Hello World Sample from the Getting Started Section.
Create a file: |fa-file-alt|
sub_container/Dockerfile1#ecal base image: 2FROM ecal-runtime 3 4WORKDIR /src/sub 5 6COPY CMakeLists.txt main.cpp ./ 7RUN cmake . && make 8CMD ./hello_world_rec
Create subscriber source code: |fa-file-alt|
sub_container/main.cppCreate file |fa-file-alt|
sub_container/CMakeLists.txtBuild the image:
cd sub_container
sudo docker build . --rm -t ecal-subscriber:1.0.0
Run the docker containers
You can run the publisher and subscriber images manually with
docker run.sudo docker run --rm -it --ipc=host --network=host --pid=host ecal-subscriber:1.0.0 sudo docker run --rm -it --ipc=host --network=host --pid=host ecal-publisher:1.0.0
You can also use the docker-compose file to manage multiple containers.
In the parent folder create file |fa-file-alt|
docker-compose.yamland paste the following content:1version: "3" 2 3services: 4 subscriber: 5 build: ./sub_container 6 image: ecal-subscriber:1.0.0 7 container_name: ecal-subscriber 8 network_mode: host 9 ipc: host 10 pid: host 11 publisher: 12 build: ./pub_container 13 image: ecal-publisher:1.0.0 14 container_name: ecal-publisher 15 network_mode: host 16 ipc: host 17 pid: host
You can now use that docker-compose to build/run the publisher and subscriber containers:
sudo docker-compose build
sudo docker-compose up
Seamless IPC-Communication across host borders
Important
This will work with eCAL 5.12 and higher.
Older versions lack the ability to utilize the host_group_name in the ecal.ini file, thus it won’t work.
In eCAL, you are able to set host belonging over network borders by utilizing the ecal.ini configuration file with the same host_group_name - in the following steps, you will learn how to set this up.
Note
If we don’t set the same host_group_name on our Host and our Containers, an IPC-Communication across host borders is not available with different host names.
To encapsulate your container network from your host network, you need to create a new docker network with the following command:
sudo docker network create --driver=bridge --subnet=10.0.10.0/24 my_network
Edit your
ecal.iniand run your Container within the newly created docker networkYou will use our previously discussed ecal-runtime-image for the next step.
First, open
/etc/ecal/ecal.inifrom your preferred editor.Search for the line
network_enabledand set it totrue.Search for the line
host_group_nameand write your preferred name.Save and close the
ecal.inifile.Now your
ecal.inifile is prepared. We want to use it not only for our Host-System but also for our Container, so we don’t need to edit theecal.iniin our Container again. To achieve that, run following command to start your container:
sudo docker run --rm -it --ipc=host --pid=host --network=my_network --name=container1 -h=container1 --ip=10.0.10.10 -v /etc/ecal/ecal.ini:/etc/ecal/ecal.ini ecal-runtime
You should now be inside the root shell of your Container. Check if your
ecal.inifile is correct.Now your Container is prepared and configured correctly, so we are ready to start an eCAL example.
ecal_sample_person_snd
Configure the Host network
eCAL is sending UDP messages to a multicast IP group
239.0.0.0/24, further information in Getting Started Section. The idea is now, to successfully receive those messages from your previously started container on your host. For that, you need to add a route to your routing table. By typingifconfigin your shell, you can identify the right docker network. In our case, the prefix of the docker network is alwaysbrfollowed by random numbers. After identifying the right network, run following command.
sudo ip route add 239.0.0.0/24 dev <br-xxx> metric 1
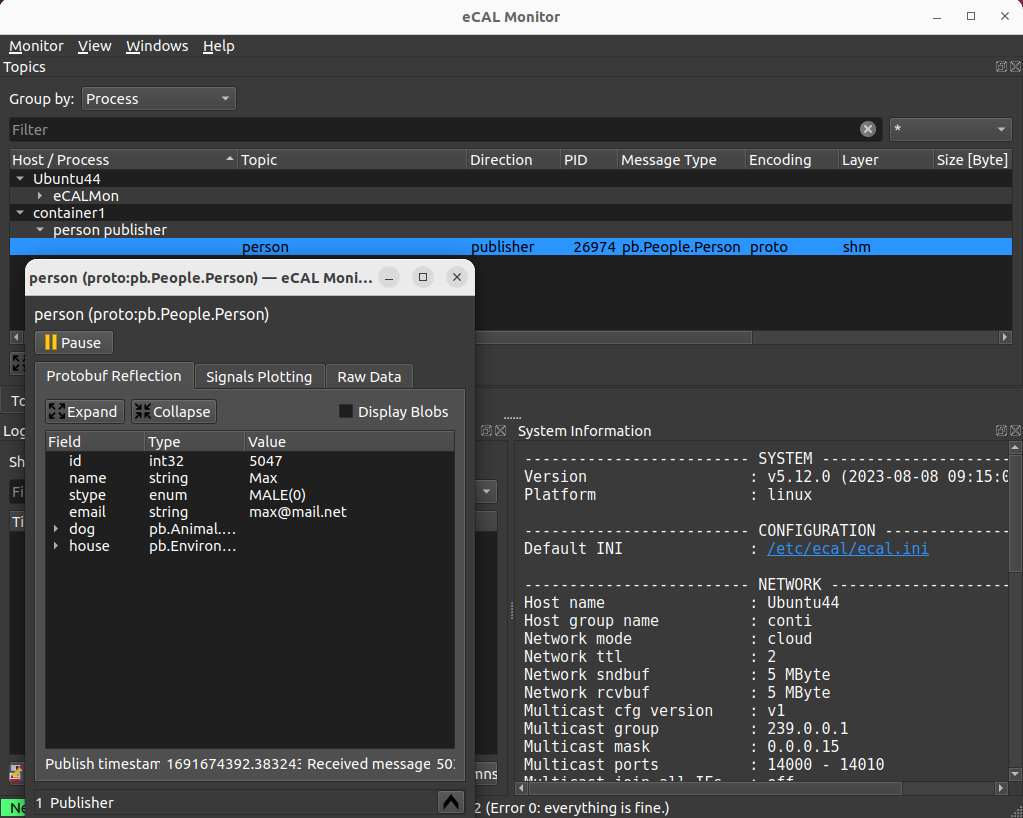
Review your network configuration. Your eCAL-Monitor should resemble this example:
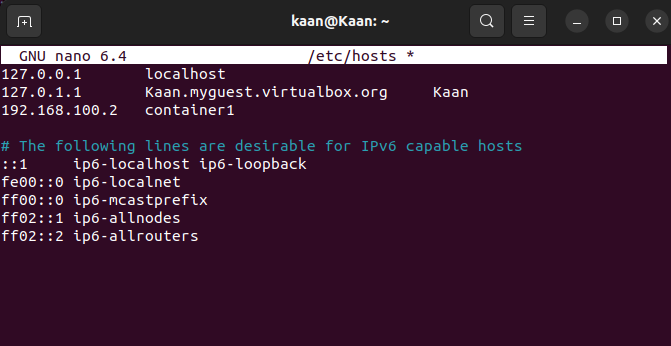
(optional) After adding the route, you register the Container with IP address and name in /etc/hosts for DNS resolution, enabling easy access to it by hostname within the network.
sudo nano /etc/hosts
When you are done, all eCAL nodes can communicate seamlessly from docker to the host and vice versa.