4. Network configuration
Hint
If you don’t have two PCs at your hand or if you are just not interested in inter-machine-communication, just skip this topic. It is not essential for the next tutorials to use cloud communication.
Of course, you can use a virtual machine (e.g. with VMWare or VirtualBox) as second PC. Just add a host-only adapter to your VM.
Quite often you want data to flow between eCAL nodes on different machines. eCAL can run in two modes, that differ from each other: local mode and cloud mode.
Local mode |
Cloud mode |
|---|---|
|
|
|
|
4.1. Enable network-mode in ecal.ini
Note
Up to eCAL 5.9, eCAL shipped with a cloud-mode-configuration by default. This changed with eCAL 5.10.
So since eCAL 5.10 you will have to enable network-mode first.
By default, eCAL is configured in local mode.
To switch eCAL to cloud mode, edit your ecal.ini and change the following settings:
|fa-windows| Windows: |ecalini-path-windows|
|fa-ubuntu| Ubuntu: |ecalini-path-ubuntu|
[network]
network_enabled           = true
multicast_ttl             = 2
The multicast_ttl setting configures the time to live of the UDP datagrams, i.e. the number of hops a datagram can take before it is discarded.
Usually, 2 is sufficient, but if you have a network with many routers, you may have to increase that number.
See also
Also see the advanced section to learn about changing between local mode and cloud mode!
4.2. Multicast route configuration
Now that you have set eCAL to cloud mode, it will already start sending out UDP Multicast packages for detecting other eCAL Nodes.
Your Operating System however has to send those Multicast packages to a proper network interface controller (NIC).
This is not trivial, as the destination IP 239.0.0.1 does not “really” exist.
Therefore you have to create a route, i.e. a 239.0.0.x -> outgoing NIC mapping.
4.2.1. |fa-windows| Multicast configuration on Windows
Check the IPv4 address of the ethernet adapter you are using to connect your two PCs. You can do that by typing
ipconfigin a command prompt. You will need the IP of your current machine you are setting the route on.Open a command prompt with administrator privileges
Enter the following line and replace xx.xx.xx.xx with your IP address
route -p add 239.0.0.0 mask 255.255.255.0 xx.xx.xx.xx
Tip
If you made a mistake, you can delete your route/s with
route delete 239.0.0.0. Your eCAL communication may not work, if you leave faulty routes in place.Reboot
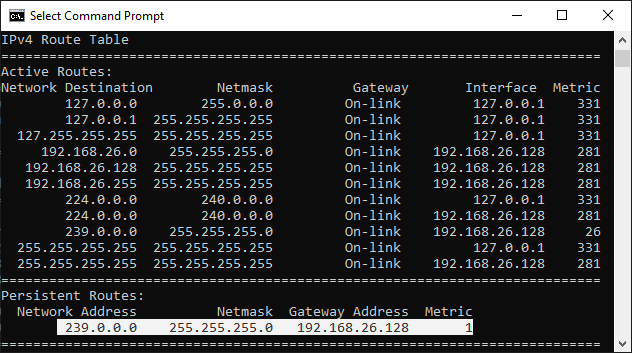
Check the result from a command prompt. It should show your route under IPv4 Route Table / Persistent Routes.
route print
Tip
It is recommended to assign a static IP, so your multicast route will not become outdated at some point.
4.2.2. |fa-ubuntu| Multicast configuration on Ubuntu
You can configure the multicast route in various ways, depending on your Ubuntu version.
Jump to your section of choice below:
Choose how to create routes:
Via netplan (Recommended for Ubuntu 18 and up. Even integrates into the GUI.)
Via GUI (Works well for desktop Ubuntu)
Via /etc/network/interfaces (Legacy, up to Ubuntu 18. Not supported in Ubuntu 20, any more.)
4.2.2.1. Test the configuration
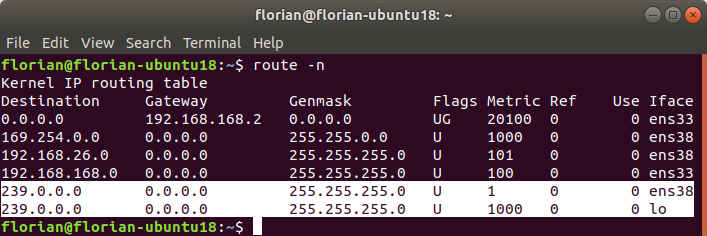
Check the result from a terminal. It should show routes for local and external communication:
route -n
4.3. eCAL Samples over network
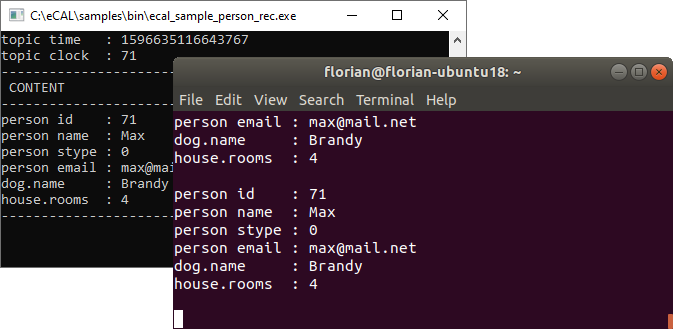
Now start one ecal_sample_person_snd and one ecal_sample_person_rec, just as in the previous section.
But on different machines!
If you configured everything correctly, publisher and subscriber should connect almost immediately and exchange data.